3D Printing under the Thermographic Microscope
Additive manufacturing has developed rapidly from its original field of prototype manufacturing, becoming a complete production technology for use on an industrial scale. Precise monitoring of machinery, equipment, materials and – above all – temperatures is of vital importance in this regard. Once the measured temperature data of components, materials or melting processes has been recorded and analysed using thermal imaging, this establishes a basis for a comprehensive understanding of the process. If a precise knowledge of the temperature development and distribution over time is obtained, and this is used to derive the targeted thermal control of the production process, the reproducibility of the process is increased and new parts with improved properties can be developed. Aconity3D supports the industrialisation of the additive manufacturing process also by using infrared cameras from InfraTec.

Aconity3D Optimises 3D Printers with Thermal Imaging
Aconity3D develops and manufactures 3D printers that can be converted using modular platforms, making it possible to adapt them to the needs of the individual user. The parameters for the machine hardware and melting process can be adjusted as required, meaning that users of Aconity3D systems are able to research and develop new process strategies in the field of 3D printing.
InfraTec Solution
Aconity3D GmbH
Thermal imaging system:
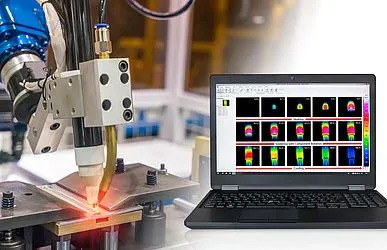
The custom 3D printers are used for laser printing of metals in a laser powder bed fusion process. This production process is relatively new and little researched, which is why engineers at Aconity3D are actively engaged in the research, development and optimisation of this form of laser melting. Their goals are to develop innovative exposure strategies and local parameter adaptations to prevent overheating and distortion of the manufactured component. Thermal imaging is used for recording and monitoring temperatures.
As a method of process monitoring, thermal imaging is also a new process in this context. Infrared cameras from InfraTec are integrated into the 3D printers for different purposes. The systems used are the VarioCAM® HD head 900 and ImageIR® 9400. While the data is conveniently recorded and evaluated using the IRBIS® software supplied by InfraTec, Aconity3D uses its own software to control the cameras and machinery. This software is connected to the infrared cameras via a trigger interface. The cameras are also equipped with the MicroScan function to improve the image quality by quadrupling the number of pixels compared with the native number.

Measurement Tasks and Challenges in the Process
There are three different tasks for infrared cameras in the context of 3D printing:
Observing the temperature-time profiles of small “regions of interest” (ROI)
In this case, it is not the recording of absolute temperatures that is crucial, but the identification of relative differences in different process strategies, for example cooling rates.
Spatter analysis
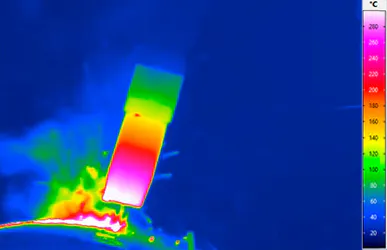
Thermal imaging can be used to visualise and quantify size, velocity, direction and distribution of unwanted and disruptive spatters. The goal is to develop process strategies with reduced spray formation.
Component monitoring
On the one hand, this relates to observing local overheating at the relevant operating points of the laser during the printing process. On the other hand, the cooling and solidification behaviour of the entire component is observed.
There are several challenges throughout the process that need to be overcome with thermal imaging. Laser powder bed fusion is an extremely dynamic process as the laser typically moves at a speed of 1 m/s. The measurement surface itself – a melt pool of approx. 100 µm in diameter – is very small and the temperature distribution within the melting bath is not homogeneous due to the dynamic flows and chemical gradients.
This means the infrared camera must be reliable when it comes to recording minimal temperature changes that occur very quickly over a small measurement surface, which also has significant temperature differences.
VarioCAM® HD head 900 in Operation
The VarioCAM® HD head 900 aims to optimise the laser powder bed fusion process in the 3D printer and observe the entire construction platform. Its task is to record the spray formation and temperature distribution within the printed layer, with a focus on observing the entire construction platform component.
The specific tasks of the VarioCAM® HD head 900 are as follows:
Checking the maximum component temperature
Developing new exposure strategies, for example geometry-dependent adaptation of the laser power to prevent local overheating
Observing spray formation, particularly the size and distribution of spray within the layer. If this spray lands in areas that will be part of the subsequent component, there is a risk that the unwanted spray will be integrated into the component and negatively impact its function. Due to its wide-angle lens and other properties, the VarioCAM® HD head 900 tends to be suited to qualitative examinations in this context.
The infrared camera has many useful features that allow it to complete these tasks in a productive and efficient way.
In the case of a change of scene, the camera automatically applies the optimum focus setting. It is also able to save rapid infrared sequences at up to 240 Hz. The laser process generates temperatures of over 2000°C. In order to protect the highly sensitive optronics, the device has a robust light metal housing with a protection degree of up to IP67. This guarantees that the device can be operated without interruption even in harsh environmental conditions. The camera’s optical and technical measurement parameters remain constant over a long service life.
As mentioned above, the VarioCAM® HD head 900 is primarily suited to qualitative examinations in this particular case. Due to its high thermal resolution, the camera can record marginal temperature differences and present these as measured values. In combination with high-performance lenses, this allows critical errors to be identified at an early stage and displayed in excellent image quality.
The ImageIR® 9400 in Operation for Additive Manufacturing
The tasks performed by the ImageIR® 9400 differ from those of the VarioCAM® HD head 900 because of its greater performance capabilities, which are due to the detector principle. The ImageIR® 9400 camera system can cover a wider range of applications due to its significantly higher frame rates, additional lens combinations and a number of other features. These applications include optimising the laser powder bed fusion process itself, as well as the laser settings with regard to local heating and cooling rates. In this context, the focus is on the material used and less on the manufactured component. In addition, it is possible to record the spray formation during the laser process and subject it to quantitative analysis with much greater accuracy due to the significantly reduced time constant of this camera system.
The specific tasks of the ImageIR® 9400
Monitoring the material created when re-melting the powder layer in the laser process
Recording the heating and cooling rates of the material, which have a significant impact on the subsequent material and component properties
Collecting data to investigate the interaction between the exposure strategy and time-temperature profiles
Collecting data to optimise the exposure strategy (laser intensity distribution, spot diameter, laser power and scanning speed, as well as wavelength if applicable)
Using the measurement data obtained through thermography, process adaptations can be made that optimise the material properties. Unlike testing methods that destroy the component, high-resolution thermography determines the relevant influencing factors during the manufacturing process itself in a contactless and non-destructive way.
In contrast with the VarioCAM® HD head 900, the ImageIR® 9400 can reproduce highly dynamic processes with great precision and can also be configured for microthermography to analyse extremely small structures. At cooling rates of 105 to 106 kelvin per second in a small frame, this is essential to ensuring that minimal temperature changes can be recorded.
High-speed mode increases the frame rate and thermal resolution and is indispensable in this regard. In this process, four pixels from adjacent cells and columns are each merged into one pixel, thereby reducing the number of pixels in the resulting thermal image. However, the frame remains constant, so that the section of the scene captured with the camera does not change. Increasing the thermal resolution ensures that even minimal temperature differences can be detected reliably.
In addition, the ImageIR® 9400 – equipped with a cooled FPA photon detector with (1,280 × 1,024) IR pixels – offers an extremely short integration time in the microsecond range, enabling rapid processes to be analysed with minimal image noise.
Benefits of Thermography Compared with other Measurement Methods
Thermal imaging is a contactless imaging technique that is non-reactive, meaning it is also non-destructive. It enables relevant data to be recorded for each component on-line in the process, meaning immediate interventions and parameter adjustments can be made during ongoing production. By contrast, destructive testing prevents a final component from being used, meaning it can only be applied to random samples.
Another benefit of infrared cameras from InfraTec is the custom configuration based on the specifications and requirements of Aconity3D. As Dr Florian Eibl of Aconity3D GmbH says:
“The combination of the Aconity3D machine (modular hardware and flexible process control) and InfraTec cameras (modular design, high resolution, numerous rapid measurement functions) gives us the opportunity to gain a better understanding of the degrees of freedom and possibilities offered by additive manufacturing for the first time, and to use them to our own benefit”.
